Hey, circusfriends! As promised, now that I’ve detailed the physics that’s happening in a hip circle, I want to outline a more practical training progression. In my experience, the most difficult part of the hip circle to learn is the kick. More specifically, how momentum is generated after you’ve lost the little bit you got from your initial dive off the bar. The easiest way I’ve found to teach this, is super simply, don’t dive!
Step 1:
Pull over the bar and settle into your hip hang. To find the sweet spot, consider yer pelvic musculature:

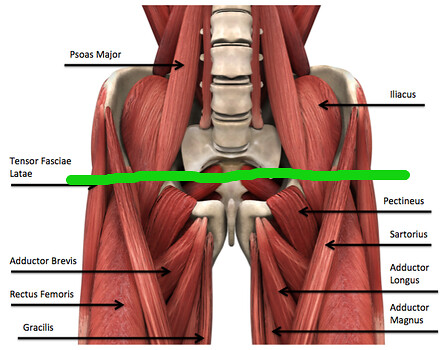
There are three handy muscles that you should take note of: the sartorius (long ropey guy that goes from the top of your hip bone to the inside of your knee), psoas major and his little brother the iliacus (they snuggle inside the dish of your pelvis and connect your spine to your femur). These three guys are firm but squishy, so put the bar on them and not on the ungoddly nerve nest of pain on the inside of your thigh. You’ll find that if you balance with your legs in parallel you will feel the bar press into your hip flexor friends and you will be joyous and gay and the sun will shine on you, but if you rotate your legs into turn out you will mash on all the angry nerve bundles and they will hurt your feelings.
Put the bar here:
Step 2:
Fold into your pike, butthole to the sky. Take time here to find where your grip is best on your thighs (for me it’s about an inch and a half above my knees: I grab the tendons), and how hard your have to pull your thighs to your chest and your chest to your thighs to get your elbows to connect with the bar (really fragging hard). Once you’re set, start bending and straightening your legs while all the rest of your body parts remain static and feel yourself rotate. Straighten the legs as you reach the top of your swing, trying to straighten them closer and closer to the ropes every time like so:
Step 3:
The first complete rotation will most likely happen when your legs have straightened at about a 45 degree angle through the ropes, or at about 11 o’clock on the video, if you consider the ropes to be 12 o’clock. The ideal place for the legs to straighten is at 9 o’clock. This allows your shoulders and the majority of your body weight to be at 12 o’clock, so the “anti-torque” (see Dat Dorque) is a minimal as possible. You’ll notice that in the following video my legs straighten lower, at around 8 o’clock and they are kind of lazy-straight with sorta bent knees. That is because I was on a free-standing training apparatus for German wheel at the Madison Circus Space (which is super cool and you should visit the fine folks there!) and you guys, it a little wobbly and I got scurrrrrd!!! I didn’t want to really throw into each rotation, so by straightening my legs at a lower position I was able to keep my angular velocity lower and reduce the amount of force in the horizontal direction, which is what would make the apparatus tip over (hypothetically).
Step 4:
Once you know where the momentum comes from, you can start the skill from a belly balance/hip balance/bird on the bar and REALLY get some speed. Try to make each rotation FASTER than the one before it!


2 Responses
Amazing ! I have not broken it down like this before ! And the 9 oclock helps ! I think I also need to pull my chest in more -and the idea of each one going faster looks amazing ! I will look at this –
I think I should video tape myself
[…] realized too late that I mis-titled my last hip circle post, because in it I didn’t really offer a progression for training hip circles at all and […]